
 Create a stunningly beautiful woman effect with photoshop. Enjoy this tutorial and leave some comments if you like it.
 Open a photo of a girl that you want to work with, the sexier it is the better!
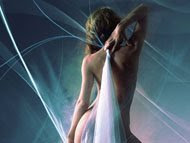
Is this sexy enough for you?
Now, Let's Begin!
Extract the lady from its background and load it to a separate layer of its own and name it "cut layer"...

Select the Brush Tool 
Now, download and load this brush into Photoshop: Odysee_brush
Add a new empty layer under "cut layer"
Pick the brush as shown below : 
Brush on the new layer like the one shown below:
Next,Download and load this brush into Photoshop : Green Lotus
Add a new empty layer above "cut layer"
Now choose the brush as shown below:
Select color #c6eaf9
Choose any of the brushes that you have just downloaded and create a new layer, and brush as much as you like until your photo looks good enough for you!
Select the Smudge Tool 
Choose this brush : (Chalk brush 60 px) 
Go to Window > Brushes, set option :

Duplicate "cut layer" once by pressing Ctrl + J on your keyboard or Cmd + J on MAC. Go back to the "cut layer". Start smudging on the edge of the lady until you end up with something like this :
Change the layer mode to Color Dodge
Now Duplicate "cut layer", a new layer will appear up on "cut layer copy"
Keep smudging on the edges...
Change the layers mode to Softlight.
Ok! Let's continue!
Click on the topmost layer on the layers palette
Go to Layer ~> New adjustment layer ~> Curve
Result would be something like the one below:
Go to menu Layer ~> New adjustment layer ~> Gradient Map
Pick any gradient you feel would be suitable to your chosen image, here's some examples :
Set the Adjustments Layer Mode to Overlay and Opacity to 70%

Set the Adjustments Layer Mode to Multiply and Opacity to 70%

Set the Adjustments Layer Mode to Soft Light and Opacity to 60%

Post a Comment